Tips...
This page will supply tips I learned from building my first pond and applied
to building my next ones. THEY ARE NOT IN ORDER OF IMPORTANCE!! I will
use pictures from that process as necessary. I will also include tips from
others on the net so if there are some things that really helped you, let
me know and I will include them here with your name and address. Send pictures
of your tips too if you have them.
This tip is so important, I am not going to number it. In the US, most
utility companies offer a service that is a MUST if you have underground
utilities. In North Texas, TU Electric calls their service Dig Safe. It's
a free service. You call them up and they will come out, locate, and mark
where your electric lines run. The gas, electric, cable, water, and phone
companies will also come out and mark. If you know where they are, you
won't cut them. This is serious stuff. A guy in our county was killed last
year digging a pond when he hit the power line...
Tip 1: You have already seen this one. Build your own filter and
use the savings for a bigger pond or for pond stuff. (me)
Tip 2: Only use 45mil or thicker rubber or EDPM liner material.
It is guaranteed for life, will not become brittle and harden over time
like plastic, is strong enough to be walked on and will take attachments
like bulkhead fittings and drains better. (me)
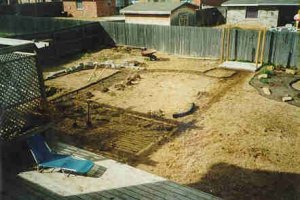
Tip 3: If you are building a big pond, go to your local rental yard
and rent a "sod kicker". No, us Texans kick the other stuff.
A sod kicker is a great tool to strip away your sod so you can reuse it
in another place. You can see the kicker in the middle left of the picture.
Water the ground real well the night before and it goes real easy, even
in the heavy soil I have. I did the area for the small 6x8 pond, the 3x16
stream, and the 12x22 main pond in about 3 hours. (me)
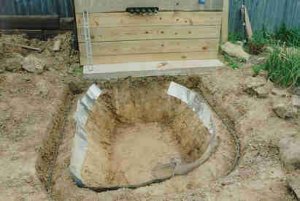
Tip 4: Whatever edging you use, pour a 2 to 4 inch concrete ledge
at the proper depth for the edging to sit on. It is best if you do this
afterwards, but if you forget or are redoing an old pond, you can use 10
inch steel or aluminum flashing, sold in rolls at your lumber store, and
long spike nails as a form. Set the edging at the proper height and drive
the nails thru the flashing, into the ground. It will hold well enough
for the light pressure of the concrete and is easily removable. And you
can even recycle it in places where there are such programs. Seal between
pieces of flashing with good ole duct tape. I have almost completed the
flashing here on the settlement pond and have also started laying in rebar
for strength. (me)
Tip 5: Forget the bog plant shelves. They are not usually in the
places you need them and they could erode in loose soil. I used to use
concrete blocks that I have thoroughly painted with cheap latex enamel
paint and a couple of 2x6 boards to add shelves where I want them. I still use
the boards, but now I build small stands out of PVC pipe. I add sand to them
to before gluing the last connection tokeep them from floating and then drill a
couple of holes drilled afterwards to let the air out. I also use plastic
milk crates or other things like that. It's a lot easier on the fish and
easier to keep the water chemistry in line. Anyway, using this method,
I can change and move the shelves anywhere I want them without
having to tear out the liner and redig. As long as the boards stay wet,
they will last a very long time. (me)
Tip 6: Use the above plastic things as supports for your lilies.
The holes in the pvc pipe towers give the fish a nice place to hide. (me)
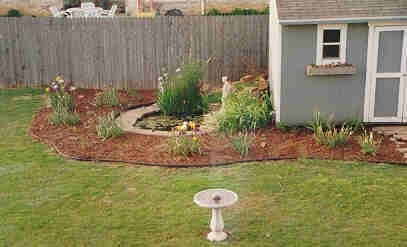
Tip 7: If you have grass close to your pond and use a power grass
trimmer, you will fling grass into the pond that you will have to scoop.
Thru testing, I have found that trimmers will throw the grass about 3 feet.
With this in mind, I build a 4 foot wide flower bed around all my ponds.
Now when I trim, I don't get grass in the pond! (me)
Tip 8: No matter what size your pond, if you are installing a flexible
or concrete liner, install an overflow. This way if you overfill your pond,
the excess water has a place to go other than flooding the neighbor's garden.
I use the heavy duty schedule 80 plastic bulkhead fittings and install
them about 6 inches below water level in the SIDE of the pond. In case
they ever do leak, I won't drain my pond. I use 2 short pieces of pipe
and an elbow to put the top of the overflow at water level. I attach the
other side to flexible drain pipe that I have run to the street. (me)
Tip 9: If you are installing a big liner, have a liner party and
invite friends over for a few brews to help you to install it. The liner
for my big pond weighed over 300 pounds! Besides, it took over 4 hours
to fill the pond and the company was welcome. Even grilled a few burgers
while waiting. (me)
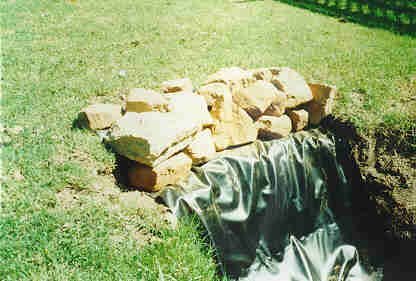
Tip 10: Test a few options with your liner edging. I used one of
my test holes and tried several different styles before settling in a hidden
liner edge. (me)
Tip 11: A friend told me a good tip. After you have established
your pond shape and laid your hose, Drive 1x2 stakes about every 12 inches
around the perimeter of your hose. Level the tops of these stakes at 1
inch below the height of the bottom of your concrete edging. When everything
is level, take 1" o.d. flexible tubing and duct tape it to the top
of the stakes. My friend used the flexible orange gas tubing that the utility
companies use. This tubing will maintain your level line and serve as a
rounded surface that will not chafe your liner when you install it later.
The stakes are also a good surface to nail the flashing forms to for the
concrete. (me)
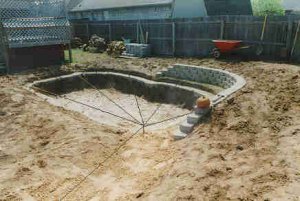
Tip 12: Check the level of the top of your pond OFTEN. Measure from
a KNOWN spot. I know of someone who checked the level on the width and
the length and both were spot on. However, they were 2 inches different
from each other! If you look at this picture, there are strings
run from a vital point (the waterfall from the stream). If you go clockwise
from the left, this string runs over the edge so I can measure down from
the string to measure this edge. HOW level your edge has to be will vary
with your edging of liner type. If you use flagstone edging or a hard liner,
you need to be level to within at least 1/2 inch. Anything different
looks funny. I also have a line running down my string from my collector
pond/waterfall to make sure that the stream slopes down. You laugh,
but if you do it wrong, it is a bear to correct. (me)
Tip 13: For streams, the steeper the slope, the more water you have
to push thru it for a given depth and width. I experimented with mine by
building an experimental stream using the sand that eventually put in the
bottom of the pond. I did this in the middle of the yard and just laid
some plastic drop cloth over it. I then rigged a temporary plumbing outfit
with my pump, some pipe and a valve. I put the pump in a kiddy pool and
just let the water run out the end of the stream out into the yard. I kept
changing the slope of the stream until I got the look I wanted. In my case,
I am putting about 3000 gph down a 14 foot stream 3 feet wide and the depth
is about 1/2 inch. I have the stream sloping about 2 inches over the length
of the stream. (me)
Tip 14: When you do ANY outside wiring, PLEASE USE GROUND FAULT
CIRCUIT INTERRUPTER OUTLETS OR BREAKERS. GFCI outlets and breakers will
trip MUCH faster than normal breakers and are a requirement in most codes
for any outside outlet or any outlet that is in close proximity to water.
Tip 15: If you use a submersible pump, you will lengthen the life
of your pump and reduce the chance of a pump barf if you attach a sacrificial
anode to your pump. Any metal pump will corrode in water due to the electrical
field that is generated by the water running thru the pump and plumbing.
Since the weakest metal will corrode first, a sacrificial anode which is
made of very soft material, will corrode before the pump parts. This has
eliminated the leaks from my Little Giant 6ECIM pump that has been running
for 3 years that everyone else has seen with these pumps.
Tip 16: If you run into a situation where real rocks just will not
work, or you need support for some real rocks, say for a waterfall, you
can make fake rocks like you have seen in the water parks and putt-putt
courses. The form is first shaped with the re-bar. Use pictures of real
rocks to give you some shape ideas.
Next attach the wire lath. This is the lath that is used for stucco work.
Wire it on very solidly to the INSIDE of the re-bar form.
Wire standard chicken wire to the outside of the re-bar. If the structure
is solid enough to walk on, it is sturdy enough.
Mix the concrete very dry. If you do not use pre-mixed, use 30 shovels
of sand to 1 bag of cement. If you use premix bags, use sand mix, not mortar.
The mix should be very dry because you don't want it to run and creep.
As with any concrete, drier mixes are usually stronger.
Trowel on the first layer. The sample I saw had only 2 layers and the first
was about 3/4 inches thick. Only mix as much as you can work comfortably.
If you have some areas that hang upside down, you might want to rough up
this section for the next layer to stick. Let this layer dry at least 24
hours.
If you are constructing a waterfall, you can lay your liner on top of the
first layer. Then cover the liner with a layer of chicken wire because
layer 2 will not stick to the liner.
Mix concrete for layer 2 like you did for layer 1. Once you get a section
laid, rip off strip of heavy duty foil and spread over the area you just
laid and, using a wet sponge, wipe the foil against the fresh concrete.
Don't laugh, as the foil conforms to your shape, it will wrinkle, fold
and whatever. This will give your "rocks" a more natural texture.
If you leave the foil on the rock, you won't wash away the concrete you
just laid when you foil the next section.
After you remove the foil, use trowels, brooms, brushes, branches, whatever
to put in the cracks, and textures you see in natural rocks. The professionals
use molds from real rocks for this.
Tip 17:Many people think about using fresh water mussels to help
them with their filtration. I'm not a big fan of this technique. Don't
get me wrong, it works, but there are better ways to do this. Mussels shoot
eggs into the water to spawn. These eggs will end up in the waterways everytime
your pond overflows. Nature doesn't need them. As an example, the zebra
mussel. These things made it into the Great Lakes as ballast in a cargo ship. They
have no natural predators here. They were first detected in 1988 and now
they're everywhere posing a multi-billion dollar threat to agriculture,
shipping, municipal water supplies, utilities. They attach themselves to
everything and you almost need to blast them off. Take a good look at this
picture. If you find them anywhere, don't throw them back into the water.
Store it in alcohol and IMMEDIATELY call the Alabama Sea Grant Extension
Office at (334) 438-5690 (e-mail zebra@acenet.auburn.edu) or the Missippi
Grant Advisory office at (601) 388-4710. They're turning up all over the
place. I have even heard of a siting in a pond.
These things made it into the Great Lakes as ballast in a cargo ship. They
have no natural predators here. They were first detected in 1988 and now
they're everywhere posing a multi-billion dollar threat to agriculture,
shipping, municipal water supplies, utilities. They attach themselves to
everything and you almost need to blast them off. Take a good look at this
picture. If you find them anywhere, don't throw them back into the water.
Store it in alcohol and IMMEDIATELY call the Alabama Sea Grant Extension
Office at (334) 438-5690 (e-mail zebra@acenet.auburn.edu) or the Missippi
Grant Advisory office at (601) 388-4710. They're turning up all over the
place. I have even heard of a siting in a pond.
Tip 18: I don't use dechlorinator anymore. They don't REMOVE the
chloramines/chlorine/ammonia. What they do is break the chlorine/ammonia
bond. The chlorine then evaporates and the ammonia is converted by your
biofilter into fertilizer. What that means is that every time you add water
and add this stuff, you are asking the gods to present you with a nice
algae bloom. This is even more of a problem for those people who INSIST
on doing regular water changes.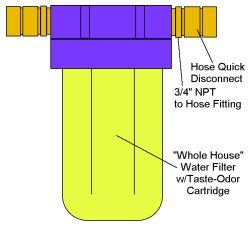 The more water you add, the more fertilizer you are releasing. But you
have to get rid of the chloramines or kill your fish. I do this with a
filter I built from about $30 in parts, about the cost of a couple bottles
of "dechlorinator". It starts with a "whole house"
filter. It's like those you may have under your sink but is has 3/4 inch
fittings, not 1/4 inch. To those openings, attach brass or plastic fittings
that go from hose to pipe. Your plumbing dealer can help find the fittings.
I use brass fittings because I also attached "quick disconnect"
fittings. When you make up all your connections, use teflon paste, not
teflon tape. The cartridge you use will be a "taste/odor" cartridge.
They come in 2 different types. One has a wire mesh around it and you can
see the charcoal in the filter, the other uses a membrane. It is the second
one you want. I replace 2 to 4 inches of water from my 12x22 and 6x8 ponds
every week during the summer and I only replace the cartridge twice a year.
Not only do you not have to add chemicals to your pond with this method,
it saves you money in the long run!
The more water you add, the more fertilizer you are releasing. But you
have to get rid of the chloramines or kill your fish. I do this with a
filter I built from about $30 in parts, about the cost of a couple bottles
of "dechlorinator". It starts with a "whole house"
filter. It's like those you may have under your sink but is has 3/4 inch
fittings, not 1/4 inch. To those openings, attach brass or plastic fittings
that go from hose to pipe. Your plumbing dealer can help find the fittings.
I use brass fittings because I also attached "quick disconnect"
fittings. When you make up all your connections, use teflon paste, not
teflon tape. The cartridge you use will be a "taste/odor" cartridge.
They come in 2 different types. One has a wire mesh around it and you can
see the charcoal in the filter, the other uses a membrane. It is the second
one you want. I replace 2 to 4 inches of water from my 12x22 and 6x8 ponds
every week during the summer and I only replace the cartridge twice a year.
Not only do you not have to add chemicals to your pond with this method,
it saves you money in the long run!
Tip 19: I know I've ranted and raved about not adding junk to your
pond. I'm going to make an exception and tell you about a good product called
Microbe Lift PL. This stuff is a veritable bacteria soup. It was originally
released to eat the bottom muck and to give your filter a kick start. The more
people look at this stuff, the more it does. For instance, I've been using it and
discovered that my algae problems are less. It seems that there's an anerobic bug
in here that works on some of the nitrates! The best part is that since it's
bacteria, when their food's gone, they die and you can scoop them out with all the
other junk. So this is a product I can add and still be able to take out! It's not
a replacement for your other good ponding practices. Think of it as icing on the
cake. And by the way, this stuff REALLY stinks in the bottle so you need to be able
to store it outside...
Don't forget, if you have any more tips or have any questions, shoot me
an e-mail at pondguy@pondrushes.net
 Back to the Start?
Because of its nature, this page will always be
 UNDER CONSTRUCTION!!!
Copyright 2003 - Chuck Rush
UNDER CONSTRUCTION!!!
Copyright 2003 - Chuck Rush